Questions and Answers
If you have a question feel free to email us. We will try to post the answers to common questions below.
Q. One of the most common questions I am being asked is how Sight Mount is mounted to the slide and whether or not the third hole is needed.
A. Here is my standard answer. Sight Mount comes with a dovetail block that fits snugly into the existing rear sights dovetailed slot after the rear sight is removed. 2 #6×48 screws with external star lock washers and Locktite secure Sight Mount to this block. A centered hole is drilled and tapped for the third screw that matches the third hole on Sight Mount. It is a .156 inch deep blind hole which is tapped to the bottom of the hole. This third mounting point uses only a screw and Loctite, no washer is used. Using all three holes the mount is rock solid, always centered, and parallel to the bore which allows a quality RMR to return to “0” when removed and replaced. Complete instructions are below.
I still get asked, “Can the third screw be left off”? My answer is the same as Burris’ in their packaging, “A third hole is provided for a competent gunsmith to add the third screw” I will add Sight Mount considers this proper installation. It simply makes no sense to me to not use it, as any sight is only as accurate as the security it is mounted with. Sight Mount has been designed for LE and Military use and becomes the weapons permanent rear sight. Shortcuts are not an option in my opinion, as lives depend on it’s performance. Most people would never think of only using one of their scope base’s available screws on a rifle as accuracy WILL be affected, Sight Mount is no different. Mounted properly it will excel at its intended purpose.
Q. What is Sight Mount made out of?
A. Sight Mount is machined from a block of 6061 T6 Aluminum to Military specs for MIL-STD-1913 (Picatinny) rail. It is then hard anodized to Mil Spec.
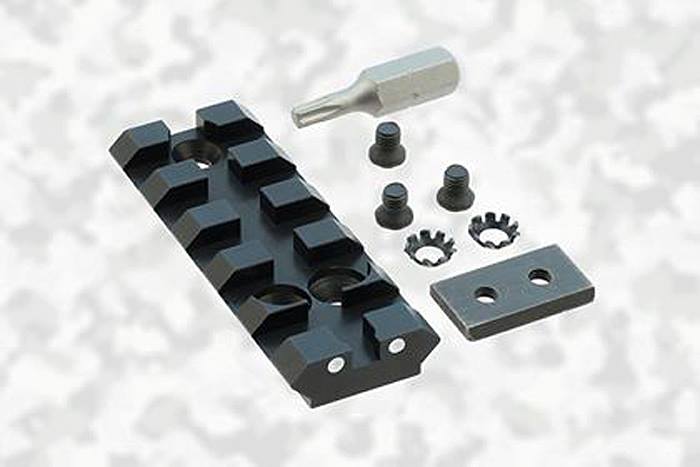
Q. A customer brought it to my attention that I didn’t have any pictures of the components that are included with Sight Mount.
A. What is included is Sight Mount and all of the components needed to properly mount it. Here is a picture.
Q. I’ve been asked to explain the steps in mounting Sight Mount. Here are the mounting instructions that are included with each Sight Mount Gunsight.
A.
- Make certain the gun is unloaded, remove the magazine and check to make sure no round is chambered….. Check again. Be safe.
- Remove the existing rear sight with a sight removal tool or a brass punch. Go slow and be careful. Beretta sights go out to the left and in from the left looking from the back of the firearm. They are tapered so be patient.
- Place the included dovetail block in the center of the dovetail slot.
- Place a screw and washer through the 2 rear holes in Sight-Mount and start them into the block.
- Be sure that you hold Sight-Mount centered and level on the slide and snug up the 2 rear screws alternating from one to the other to keep it level. Do not tighten these screw yet. Mark the position of the third forward hole.
- At the position of this hole a skilled gunsmith or machinist will center and then drill and tap a blind hole .160 inches deep and threaded to the bottom into your slide for the third screw. It is a 1/8 inch long #6 x 48 TPI screw. Do not use a lock washer on this screw as it may impede part of the sight channel. This third screw is the primary anchor point for Sight-Mount and is mandatory and required for proper installation. Sight Mount will become your permanent rear sight as well a mounting platform for your expensive optics, just as the bases for your expensive rifle scopes it is mandatory that it be mounted properly and securely. Use of Loctite or similar compound is recommended on all 3 of these screws and they are tightened to 12 to 15 inch pounds. Sight Mount does not imply or accept responsibility for damages to your person or your property by your use of our product. All three screws are #6 x 48 x 1/8 inch. Model 10512, has 2 longer screws for the dovetail block position.
- You are now ready to mount your reflex sight by using the manufacturers Picatinny adaptor. Place it in the center of Sight Mount, and hold pressure forward against the recoil lug as you tighten the adapter. Always apply this forward pressure when mounting an optic as this will aid it in returning to”0” Point of Aim every time.
![]()
Sight Mount Gunsights LLC![]()
![]()
PO Box 13
Sweet Home OR 97386
541-621-9277
info@sight-mount.com